Sometimes, you may want to see budget changes that are made by your managers before you allow them to become part of the official numbers.
With this in mind, we have built Approvals functionality into Budgyt. Approvals may be requested down to the sub category level, and there may be one or multiple approvers as required.
Activation
The approval procedure's default mode is OFF. To switch it on, go to Settings > Preferences and check the Turn on Approvals box. Approvals are turned on for each budget individually, so once the procedure is switched on, you will need to go to Budgets > Manage Budgets and turn on Approvals for each budget that needs it by checking the Require Approval box.
At the time that the Approvals are switched on, all current data is considered approved. Any changes made after this will be subject to approval.
Choosing Approvers
Each user that will be requesting approval can be assigned a particular approver(s). Go to All Users, select the edit tool for the user in question, and choose their approver(s) from the drop down menu.
Inputting Data
Users will enter data in the data sheet as normal, but when they hit save, they will notice that the new data will turn to a grey, italicized font, and will show as (pending). To send for approval, the user must check the box at the left of the sub category row, and then click the Thumbs Up icon. This will change the status to (Sent).
If there are a number of items to submit, the user may go to Activity > Approvals and use the check boxes at the left to select all the items that need to be sent for approval, before hitting the Send for Approval button at the top right.
To check that all entries have been sent for approval, the user may go to the PL by Departments dashboard, and select the Pending option from the Status menu just above the data table on the left. This will display any pending items with a yellow background. Clicking on these allows them to be sent.
Approving Changes
Once a change has been submitted for approval, the designated approver will see a notification on the bell icon at the top right of their screen. Clicking on this notification will take the approver directly to the data sheet where the change was made. Here they will see an "i" icon on the sub category row that will open up a window displaying the change and allowing the approver to write a comment, and approve or reject the change.
If the change is approved, it will be considered part of the budget and the font will return to normal. If it is rejected, the change will be removed, and the original numbers reinstated. In both cases, the user requesting the approval will be sent a notification.
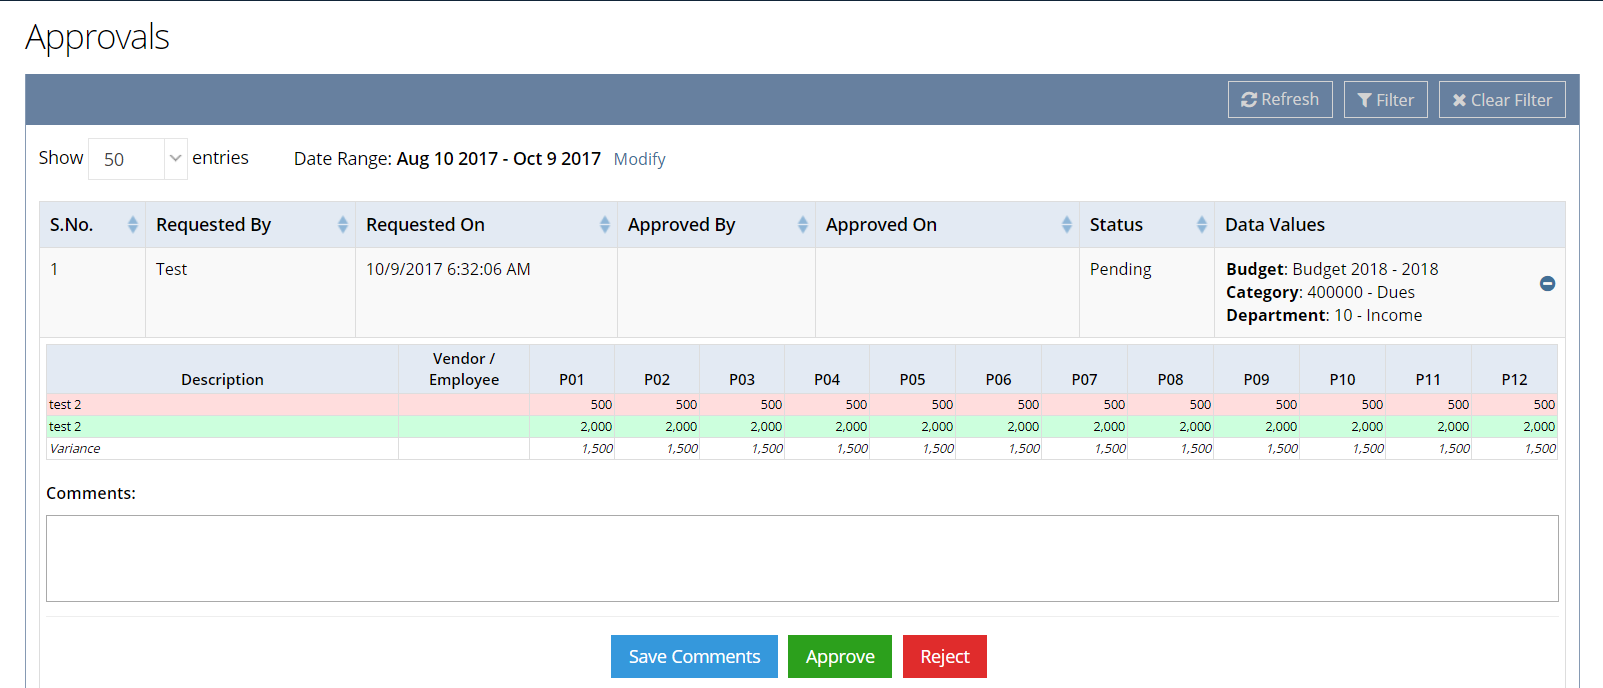
Approval requests will also be available in Activity > Approvals, where they may be approved or rejected without visiting the data sheet. Here, the approver will see 3 lines of data: pink represents previous data, green represents data awaiting approval, and white represents the variance between the two. Also, comments may be sent back to the requester before a decision is made, by entering them in the field provided and clicking Save Comments.
Approval Log Window:
Hierarchical Approval
During budget season, an approver may receive many submissions from people working on the budget. To approve each of these individually can be time consuming, so Budgyt allows approval at a higher level. Under the green drop down menu on the Dashboard there is an Approvals option. When this is selected, any data point on the dashboard that contains details that need to be approved will have a yellow background, and all data below an item that is clicked in the hierarchy of the chart of accounts will be approved or rejected. eg. approving Revenue for Division 1 in the example below, will approve all items in any GL account within the Revenue group for any Department within Division 1. This makes the managers job much simpler during budgeting.

Multiple Approvers
If it is necessary for more than one user to approve a number, this is also possible within Budgyt. To set up multiple approvers, first go to Settings > Preferences and check the Require All Approvers Approval. Then in the user edit page, choose as many approvers as are needed. These multiple approvals are not sequential, each approver operates independently of the others, and the change will not be approved until all of them have seen it.